
GEIGER RESEARCH INSTITUTE of SUSTAINABLE BUILDING
Home
About Us
What's New
Workshops
Certification
Training
Projects
Publications
House Plans
Image Galleries
SBE Directory
Resources
Consulting
Blog
Links
Contact Us
FREE Straw Bale Emergency Shelter Plans
Builders Without Borders Straw-Bale Construction Guides
The Last Straw -
The International Journal of Straw Bale and Natural Building

- Promoting natural building, and sustainable design and development, through research, training, education and consulting services.
Click here to view the Straw Bale Shelter Plans in Microsoft Word.
Click here to view page one of the plans as a JPEG image.
Click here to view page two of the plans as a JPEG image.
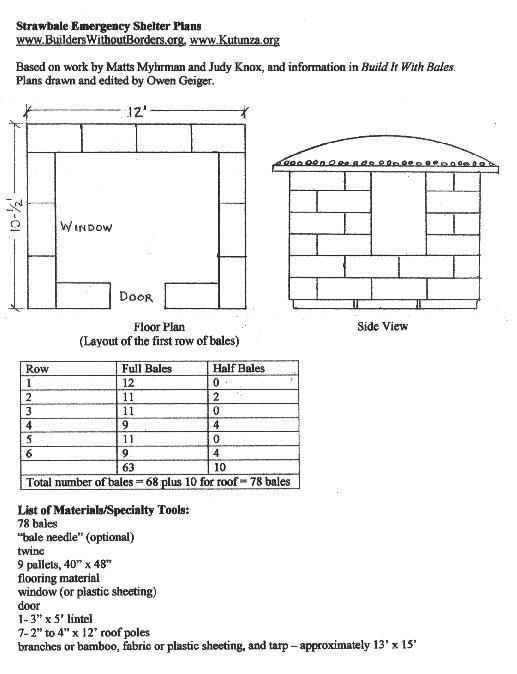
Number of full bales and half bales on each row:
| Row | Full Bales | Half Bales |
| 1 | 12 | 0 |
| 2 | 11 | 2 |
| 3 | 11 | 0 |
| 4 | 9 | 4 |
| 5 | 11 | 0 |
| 6 | 9 | 4 |
| 63 | 10 | |
| Total number of bales = 68, plus 10 for the roof = 78 | ||
List of Materials/Specialty Tools:
- 78 bales
- ōbale needleö (optional)
- twine
- 9 pallets, 40ö x 48ö
- flooring material
- window (or plastic sheeting)
- door
- (1) - 3ö x 5Æ lintel
- (7) - 2ö to 4ö x 12Æ roof poles
- branches or bamboo
- fabric or plastic sheeting
- tarp: approximately 13Æ x 15Æ
Notes:
- Total cost: $300 - $350 US$
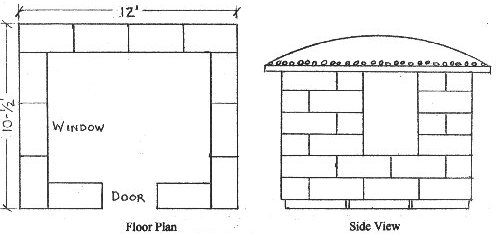
- Exterior dimensions: approximately 10-1/2Æ x 12Æ = 126 sq. ft.
- Interior dimensions: approximately 7-1/2Æ x 9Æ = 68 sq. ft.
- Plans based on two-string bales of approximately 15ö x 18ö x 36ö-38ö
- Stack bales on pallets, add spaces between pallets if necessary to match size of bales, gaps around the edges can be sealed with earth and/or stone.
- Six rows of 15ö high bales = 90ö interior height.
- Stack bales ōflatö for stability (ties not showing) in a running bond like brickwork (where each bale overlaps the joint below it).
- Extend bales about 1ö over edge of pallets to reduce risk of moisture damage.
- Make 10 half bales from 5 full bales. One method uses a ōbale needleö and twine to tie two new half bales before cutting the original strings.
- Other foundation options: tires filled with rammed earth, railroad ties, stone, etc., if pallets are not available.
- Flooring options: plywood, boards (including wood from disassembled pallets), cardboard, new/used carpet, earth, etc. (could add later to save on materials).
- Tie corner bales together on each course.
- Exterior pinning with branches, bamboo, etc. is optional but does increase wall stiffness. Tie pins (one on each side of the wall) together with twine, place twine between bales as walls are stacked, space pins approximately 18ö apart (two per bale).
- Lintel over door: approximately 3ö diameter x 5Æ long wood pole, metal pipe, etc. placed on top row of bales, preferably in appropriately deep notch cut into the bales it rests on.
- Window opening starts on the third row and extends to top of wall.
- Roof poles: seven poles 2ö- 4ö diameter x 12Æ long, set 24ö apart, tied to 2 or 3 lower rows of bales to resist uplift (place twine between bales as walls are stacked or use a ōbale needleö to feed twine through the wall).
- Place branches, bamboo, etc. about 3ö apart perpendicular to roof poles to support straw above and create 6ö- 12ö overhang beyond surface of wall.
- Add flakes of straw on top of the walls between roof poles.
- Add fabric, plastic sheeting, etc. on top of roof system before adding straw ceiling insulation.
- Straw ceiling insulation: use broken bales or loose straw to create a curved mound. Full bales could be used in extremely hot or cold climates, but a curved surface is still needed to shed water. The increased weight of full bales might require a stronger roof, especially with a snow load.
- Cover the mound with a tarp fastened to the bottom of roof overhang (screws and washers work well).
- Door options: old doors, blankets, woven mats, recycled carpet, hides, etc. (door frame is optional).
- Window options: old windows, plastic sheeting, broken glass set in earth, etc. (window is optional, but valuable for daylight and, perhaps, cross-ventilation).
- Extra bales can be used as steps to reach the upper rows and roof during construction.
- This shelter can be easily upgraded to a permanent shelter by adding plaster, a more durable roof, and other improvements.
- This shelter should be modified to meet local needs. For example, increase the roof overhang in rainy climates.
- Please refer to the leading how-to straw-bale construction guide, Build it With Bales, by Matts Myhrman and S.O. MacDonald for detailed information on building with bales.
GEIGER RESEARCH INSTITUTE OF SUSTAINABLE BUILDING
Crestone, Colorado 81131 Email: Contact Information